How to easily convert and burn QuickTime (.MOV) videos to DVD?
Want to learn the easiest way to convert MOV to DVD or convert QuickTime to DVD? Check out our tutorial below. So while away, you used your digital camera to make home/holiday videos which come as .MOV files. Or you may have downloaded some video clips to your computer and they are .MOV files. Is there a proper and efficient way to convert and burn MOV to DVD so that you can play your videos on a home DVD player attached to a television? Well, with DVD Creator which serves as the best MOV to DVD converter, you can convert QuickTime/MOV videos to DVD in a simple way without complicated steps. Read on and learn the simplest way to convert QuickTime/MOV to DVD. First of all, free download DVD Creator.
Free Download DVD Creator 15.0MB 
Free Download DVD Creator for Mac 20.4MB 
Step 1 Load QuickTime/MOV videos Click on Load Video button in the upper left interface to locate QuickTime/MOV files, and add them to this QuickTime/MOV to DVD converter. Drag and drop loaded QuickTime/MOV videos to the storyboard below to proceed with QuickTime/MOV to DVD conversion.
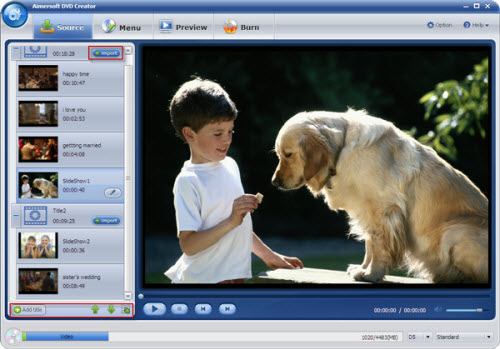
Step 2 Edit QuickTime/MOV movies (Optional) The plug-in video editor lets you edit videos quickly and easily. Select a video file in storyboard and click on Edit selected video file button to crop, trim, add watermark, plug in subtitles or adjust video effects, according to your specific request within minutes.
Step 3 Burn QuickTime/MOV videos to DVD Once you’ve added videos to the program, now you can convert and burn QuickTime/MOV videos to DVD directly. Of course, you may personalize your DVDs by adding transition effects, customize DVD menu templates, and edit downloaded movies, etc.
Burn QuickTime/MOV to DVD disc: Click "Burn", select "DVD" option in the "Burn to" field, select your TV Standard and output Aspect Ratio, and click "Start" to burn your project.
Burn QuickTime/MOV to ISO or DVD Folder: Click "Burn", select the "DVD Folder" or "ISO file" option, specify a folder to save generated DVD files, then click "Start" to start converting QuickTime/MOV to ISO or DVD folder.
So, you just have finished burning QuickTime/MOV to DVD, now you can play your MOV files on home DVD player in your living room through TV. Also, now you may share your favorite movies with your friends. Enjoy.
What is QuickTime (.MOV) file? The QuickTime (.MOV) file format is a file extension used by the QuickTime-wrapped files. The format was created by Apple Computer to work with multimedia files. Though MOV files are quite often found in the web, to play them on Windows computer one has to install an extra component or convert to other format. MOV is a container format and can contain video, animation, graphics, 3D and virtual reality (VR) content or text (for subtitles, for example). With DVD burning tool, you can burn QuickTime MOV videos to DVD easily.
More: How to easily convert and burn QuickTime (.MOV) videos to DVD?
mov to dvd, quicktime to dvd, convert mov to dvd, convert quicktime to dvd, mov to dvd converter, mp4 to dvd, convert mp4 to dvd, burn mp4 to dvd, mp4 to dvd converter, itunes to dvd, wmv to dvd, avi to dvd, mkv to dvd, m4v to dvd, youtube to dvd, torrent to dvd, vuze to dvd, flip video to DVD, remove drm from itunes, remove drm from bbc iplayer, remove drm from amazon unbox, remove drm protection, drm removal tool, dvd burning tool, dvd software
How to burn iTunes movies to DVD effectively?
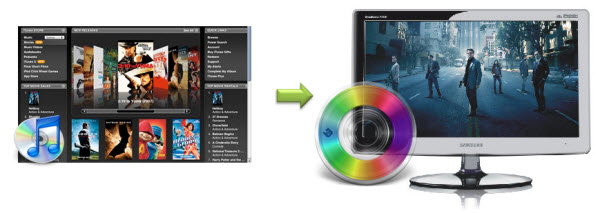
iTunes is a media center where we can download music and videos easily. However, music and movies purchased from iTunes can be only played on Apple products due to DRM (Digital Rights Managements) protection. If you want to view your iTunes purchased movies on your home DVD player, you will have to remove iTunes DRM first and then you are able to burn iTunes movies to DVD. Here’s we include the easiest solution to remove DRM and burn iTunes movies to DVD. Learn today and enjoy your iTunes media files freely.
Part 1 Remove DRM protection from iTunes
Media Converter has been recognized as the most powerful iTunes DRM Removal Software which lets you remove DRM protection from iTunes easily. Highly recommended and you will be amazed at how it works. Here’s the step by step guide on removing iTunes DRM protection:
Step 1 Download DRM removal tool, install and launch it.
Step 2 Add DRM protected files. Or let Media Converter find DRM files by clicking Add button.
Step 3 Set the output file format according to your specific needs.
Step 4 Once everything is ready, click on Start to remove DRM protection.
Tips: This Media Converter can also remove DRM from other protected music and video files (iTunes, Windows Media Center, Napster, Pandora, Spiral Frog, Amazon Unbox, CinemaNow etc); it also works for unprotected video and audio files, support all common media formats.
Part 2 Burn iTunes movies to DVD playable on home DVD player
Regard to DRM protection removed iTunes movies, you may want to view them on your home DVD players. In this case, you will need a DVD burning software to convert and burn iTunes to DVD. DVD Creator is an easy to use iTunes to DVD converter software. Below is the detailed guide on burning iTunes movies to DVD:
Free Download DVD Creator 15.0MB
Free Download DVD Creator for Mac 20.4MB
Step 1 Load iTunes videos
Click on Load Video button in the upper left interface to locate iTunes movies, and add them to this iTunes to DVD converter. Drag and drop loaded files to the storyboard below to make further operation.
Step 2 Customize DVD menu (Optional)
Personalize the DVD menu by selecting from the built-in various DVD menus to make a professional -looking DVD. Of course, you may personalize your DVDs by adding transition effects, customize DVD menu templates, and edit downloaded movies, etc.
Step 3 Burn iTunes movies to DVD
Once you’ve added videos to the program, now you can convert and burn iTunes videos to DVD directly.
You’ve learned how to burn iTunes movies to DVD. DVD Creator also lets you burn all other kinds of videos and movies to DVD disc.
More:
How to convert and burn iTunes movies to DVD?
MP4 to DVD, AVI to DVD, WMV to DVD, QuickTime MOV to DVD, MKV to DVD, iTunes to DVD, M4V to DVD, YouTube to DVD, Burn/Copy Protected DVD, Remove DRM from BBC iPlayer, Remove DRM from WMV, Remove DRM from WMA, Remove DRM from Amazon Unbox, Convert iTunes videos to Zune, Remove DRM protection, DRM Removal Tool, DVD Burning Tool, DVD Burning Software, Mac DVD Burning Software,Video Converter Tool, Mac Video Converter, DVD Ripper Tool, DVD Copy Tool, DVD Soft
How to remove DRM protection from M4V/WMV/M4P/AAC/M4A/WMA?
Media Converter is a professional DRM Removal Software that is able to remove DRM protection from videos and music downloaded and purchased from online stores like iTunes, Windows Media Player, Napster, Amazon Unbox, Wal-Mart, Pandora, Rhapsody, Bearshare, BBC iPlayer, Amazon video on Demand and other DRM protected media center in a legal professional way. It supports both protected & unprotected WMA, M4A, M4B, M4P, ACC, OGG, AC3, WMV, M4A, MOV, FLV, M2TS, TS, TRP, and more.
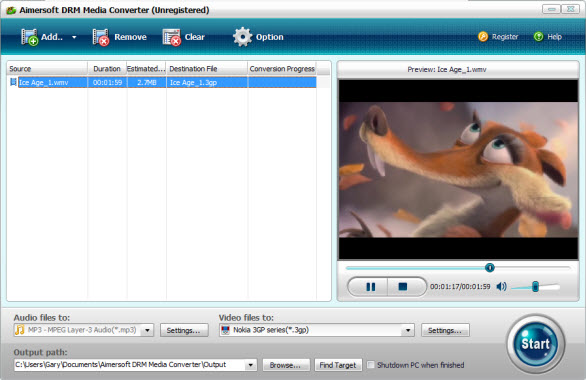
Step 1 Add DRM files to Media Converter
Click “Add” button, here you can add files or let the tool find DRM files and then import them to Media Converter. The default setting works well with your PC without any extra configuration. Besides, the batch conversion mode supports input several files at one time.
Tips: you can choose "Remove" to remove added files one by one, or you can choose "Clear" to remove all imported files.
Step 2 Customize output format
After you added files to Media Converter, you can select the output file according to your digital player or you can just select common video/audio file. Choose an output format from Convert audio to or Convert video to. Settings button lets you have more choices, such as resolution, frame bite, encoder, and bit rate.
Step 3 Remove DRM protection
You may customize the output path by clicking “Browse”. Once you've finished all the settings, click on Start button. Media Converter will now conduct the DRM removal process.
After conversion, you can click “Find Target” to open the output folder and find the converted unprotected files. And now you are able to enjoy, listen and transfer the files freely.
Note: Besides the capability of removing DRM protection from M4V, WMV, M4P, AAC, M4A, WMA, OGG, iTunes, Napster, Rhapsody, this Media Converter also serves as a Converter tool which lets you convert unprotected video/audio files.
What is DRM?
Digital rights management (DRM) is a generic term for access control technologies that can be used by hardware manufacturers, publishers, copyright holders and individuals to limit the usage of digital content and devices. The term is used to describe any technology that inhibits uses of digital content not desired or intended by the content provider. The term does not generally refer to other forms of copy protection which can be circumvented without modifying the file or device, such as serial numbers or keyfiles. It can also refer to restrictions associated with specific instances of digital works or devices. Digital rights management is used by companies such as Sony, Amazon, Apple Inc., Microsoft, AOL and the BBC. With DRM Media Converter, you can enjoy DRM files on your digital players freely and legally.
More tips:
Remove DRM from BBC iPlayer, Remove DRM from WMV, Remove DRM from Amazon Unbox, MP4 to DVD, AVI to DVD, WMV to DVD, QuickTime MOV to DVD, MKV to DVD, iTunes to DVD, M4V to DVD, M4V to WMV, Burn/Copy Protected DVD, DRM Removal Tool, DVD Burning Tool, Video Converter Tool, Professional DVD & Video Soft
More:
How to remove DRM protection from M4V/WMV/M4P/AAC/M4A/WMA/iTunes/Napster?
How to burn MP4 (MPEG-4) videos to a DVD?
So you have downloaded movies and taken videos in the MP4 (MPEG-4) video format. Want to play MP4 files on home DVD player in your living room sitting on the couch? Well, due to the limits of most DVD players' capabilities, the original MP4 files can't be played directly on regular home DVD players. Therefore, you need to convert and burn original MP4 files to a DVD format. And if you download the right software, you can burn MP4 to DVD. DVD Creator is exactly the professional MP4 (MPEG-4) to DVD converter that lets you convert and burn MP4 to DVD format. Well, this tutorial will show you the step-by-step guide on how to convert and burn MP4 to DVD format to play on home DVD player. Check it out now!
Step 1 Download DVD Creator
Download MP4 to DVD Converter to a known location. Once you've downloaded the program, double click the .exe file to install it.
Step 2 Load MP4 videos
Click on Load Video button in the upper left interface to locate MP4 (MPEG-4) files, and add them to this MP4 to DVD converter. Drag and drop loaded MP4 videos to the storyboard below to make further operation.
Step 3 Edit MP4 movies (Optional)
The plug-in video editor lets you edit videos quickly and easily. Select a video file in storyboard and click on Edit selected video file button to crop, trim, add watermark, plug in subtitles or adjust video effects, according to your specific request within minutes.
Step 4 Burn MP4 videos to DVD
Once you've added videos to the program, now you can convert and burn MP4 (MPEG-4) videos to DVD directly. Of course, you may personalize your DVDs by adding transition effects, customize DVD menu templates, and edit downloaded movies, etc.
So, you just have finished burning MP4 (MPEG-4) to DVD, now you can play your MP4 files on home DVD player in your living room through TV. Also, now you may share your favorite movies with your friends. Enjoy.
More: How to burn MP4 (MPEG-4) videos to a DVD?
AVI to DVD, WMV to DVD, QuickTime MOV to DVD, MKV to DVD, iTunes to DVD, M4V to DVD, M4V to WMV, Remove DRM Protection, DVD Burning Tool, Video Converter Tool, Professional DVD & Video Soft
How to convert and burn Flip videos to DVD?
Looking for the fastest and easiest program to use in order to convert and burn Flip videos to DVD format? Check out our tutorial on how to realize the Flip video to DVD conversion with a professional Flip video to DVD converter. Flip video cameras and camcorders make it easy to shoot our home videos. Thanks to the camera’s small size we can film our lives whenever we want to. The camera’s built-in USB connector enables us to transfer Flip videos to computer easily. Once you’ve uploaded Flip videos to your hard drive, you can convert and burn Flip videos to DVD. The simplest application for Flip video to DVD conversion is definitely DVD Creator.
Here’s the guide on how to convert Flip video to DVD in just a few steps.
Step 1 Download DVD Creator
Download Flip video to DVD Converter to a known location. Once you’ve downloaded the program, double click the .exe file to install it.
Step 2 Load Flip videos
Assuming that you have already transferred Flip videos to your computer, click on Load Video button in the upper left interface to locate Flip files, and add them to this Flip to DVD converter. Drag and drop loaded Flip videos to the storyboard below to make further operation.
Step 3 Edit Flip movies
The plug-in video editor lets you edit videos quickly and easily. Select a video file in storyboard and click on Edit selected video file button to crop, trim, add watermark, plug in subtitles or adjust video effects, according to your specific request within minutes.
Step 4 Burn Flip videos to DVD
Once you've added videos to the program, now you can convert and burn Flip videos to DVD directly. Of course, you may personalize your DVDs by adding transition effects, customize DVD menu templates, and edit downloaded movies, etc.
So, you just have finished burning Flip to DVD, now you can play your Flip files on home DVD player in your living room through TV. Also, now you may share your DVD movies with your friends. Enjoy.
More: How to convert and burn Flip videos to DVD?
How to convert and burn Kodak videos to DVD?
How to convert and burn Sony videos to DVD?
How to convert and burn Canon videos to DVD?
How to convert and burn Samsung videos to DVD?
MP4 to DVD, AVI to DVD, WMV to DVD, iTunes to DVD, QuickTime MOV to DVD, DRM Removal Tool, DVD Burning Tool